22 December 2014

The Itty Bitty TC Committee

The TIG Q28 BNC


The usual iteration process with tech is more features in a smaller form factor. While the new TIG is certainly smaller and lighter, it offers the same features as the original model. This is a good thing. The primary appeal of the TIG (beyond the audio output/mix feature) was its small form factor relative to the other leading TC boxes. The Q28 is smaller still, meaning less weight on the small cameras that it can enable timecode upon.

Not quite the "Ascent of Man", but close...

The first version of the Q28 used a Lemo for TC IO. While the Lemo is a common standard, it’s used less often than the BNC. The BNC may offer less functionality per millimeter of chassis real estate in that it is unidirectional, but it has the advantage of a very affordable, commonly available cable. This means that the new Q28 can be integrated into most existing kits without having to either replace or augment a cable package.


Tucked cozily upon a Canon C300, courtesy of Koerner Camera.
As you can see (or not), it almost disappears, Predator-like, into a modern camera build. I can tell you that during this test, the rather non-compliant BNC weighed more than the TIG itself, and kept lifting it off the camera body.

"IT HAS A TELL-TALE SHIMMER."


As mentioned, this model offers the same feature set as the original TIG (my review of which you can read here), so I won’t bother rehashing those. This is mainly to demonstrate its new svelte design. As cameras get smaller and lighter (and ACs get bitchier...JK, LUV U!), rigs become more elaborate. Any size and weight savings will be appreciated, and the TIG Q28 is a barely-there sync solution.

There are 23 TIGs in this picture. Find them all and win a prize!*

*Management accepts no responsibility for lack of actual prizes.

Introductory price: $439

17 December 2014

L Yeah!

The Lectrosonics L Series Wireless


In March 2014, Lectrosonics announced the L Series Wireless systems, essentially a revamp of the L series for affordable wireless systems for use in feeding smaller DSLR cameras. The “L” indicates “Large Bandwidth”, one of the major facets of the revamp being a switch to a wider RF spectrum. What that means is that the tuning hardware now covers three of the existing blocks, rather than one as the current systems do. This is part of an industry wide trend, ostensibly to future-proof our wireless systems as more spectrum is auctioned off either to wireless carriers or set aside for a future “internet of things”. A wide band unit will likely not have to be either re-crystaled or replaced down the line, an attractive selling point in an industry that, like anything tech-driven, is subject to relentless change. Having three blocks available per band means that a mixer has up to 3072 available frequencies, plus a wide enough safety margin that even losing an entire block means you’ll have two more still available.


Before liposuction; after.


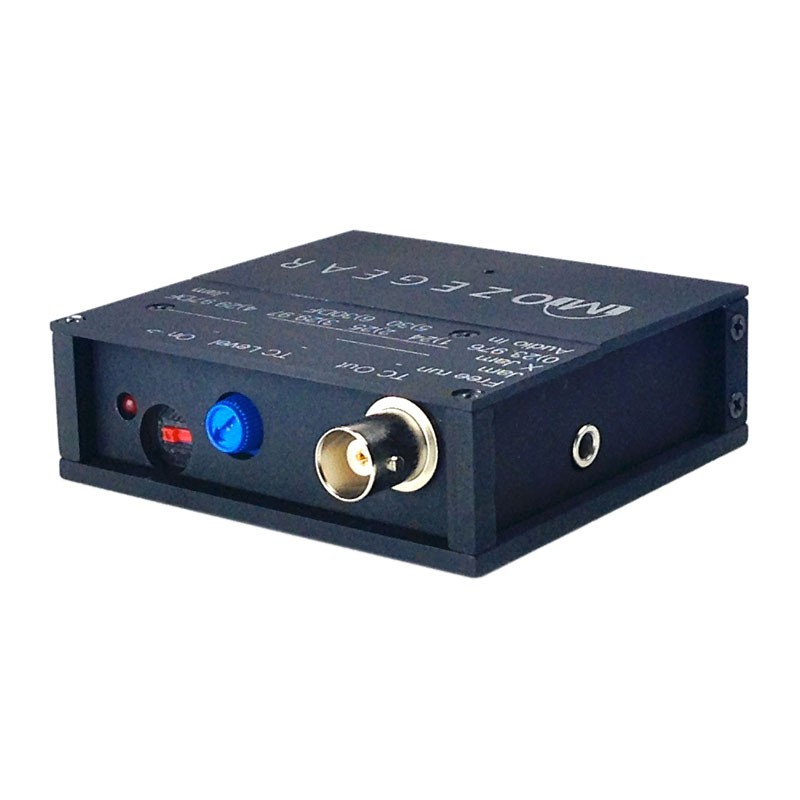
The new line features the LT transmitter, which is like a more rectangular SMQV. (The L Series also includes the LMb TX, but given that it tops out at 50mW, I decided to only test the LT, as it’s more comparable to the SMQV.) It similarly takes power from two AA batteries, accessible through a sliding side cover, rather than bottom. This brings back the sliding door similar to earlier models powered by 9V batteries. I feel like it saves a few seconds in batt changes, and feels more secure than the threaded latch; no more slightly uneven contact, or over/undertightening of the compartment. With the lack of rounded edges, it’s slightly larger than an SMQV, so if hiding a TX is something critical to your gigs, it’s something to consider. The wire belt clip is now a tension fit, secured in two holes on the sides of the unit. This also saves users from lost tightening screws when removing or replacing the clips.

Switch it up.
For certain applications such as sports or live events, the unit features a toggle switch on top of the unit. This can be assigned as a mute switch, power, or talkback with the appropriate RX. For standard uses you can leave it unassigned.


The side panel is home to the menu display screen and a handful of membrane buttons, similar to the SM series. Lectro has now added a dedicated power button, so firing it up is a single long press, rather than two-button affair (the switches can be locked to prevent “butt power downs”). 


The menu itself is straightforward, with top-level access to all functions, again negating the need for a two-button press. It features compatibility modes like the rest of the 400 series, enabling it to transmit to a host of receivers, whether from Lectro or other brands (though, not simultaneously. Once you switch into a certain mode, it can only transmit to a receiver that is compatible with that specific mode. This is similar to the other units in the 400 series). The TA5M mic input is the same as the SM series, on top of the unit, adjacent to the SMA antenna mount and the aforementioned function toggle. Next to this are the mic level and power LEDs...


"My eyes! The goggle do nothing!"

...which brings me to the light show. There’s a whoooole lotta lights happening on the TX, on both the sides and top of the unit, whereas with earlier models is was either the side or the top. They’re very, very bright (to the point that if they’re placed face up on a table in a dark room, you can do shadow puppets on the ceiling. No joke, I actually did this), and while indicators are very useful, they can be distracting, even in a non-narrative shoot environment like a live event. 


Not quite "Laser Floyd", but close.

I broached the subject of a “high, low, off” menu setting for the LEDs (the display screen’s settings have their own menu) to Karl Winkler of Lectro, who said he’d pass it on to the engineers. Yes, you can gaff tape the unit, but then you gunk up your gear. A menu-based adjustment would be cleaner in every sense.

The LR receiver is the more interesting beast here. Slightly taller than the LT, it’s almost half as large as as 411. It features a very similar design to the LT, insofar as its chassis, button pad, belt clip and battery compartment. One welcome addition is the blue RF link LED. If you’re in a hurry, a bright blue light confirms positive reception of the intended TX. The top of the unit differs in that it has dual SMA antenna mounts and a TA3M output. Audio output on the top of the unit means cables running up and then down in a bag setup. Perhaps not a deal breaker, but less clean than running power and audio from the bottom, as with the 411.


One sticking point: with the display screen on the side of the unit, you have no way to read your RXs at a glance without lifting them out of the bag and tilting them. With a couple, it’s not an issue, but with six or more, it becomes untenable. 

LT in the side pocket.
Lectro says the new unit is intended to serve as a camera hop, where a side display makes more sense. The smaller form factor means that it can easily be mounted on a hot shoe plate on a DSLR without becoming too unwieldy. In a bag situation, however, the top display is far more functional, even more so with multiple units packed together.

I’m assuming the primary question readers are going to have is this: given the lower street price ($2390 for an LT/LR channel versus $3105 for an SMQV/411 channel), how does it perform? I conducted a few walk tests, first with an SMQV, then the LT, both TXs set to 100mW with the same Sanken COS-11. I rigged up the LR to receive the same frequency, and panned it right on my Sound Devices 664, with my 411 panned left, and set levels to match as closely as possible, so that in addition to being able to see their respective RF levels, I could also hear any dropouts in individual ears.

I wired up my intrepid assistant (bribed with a “free lunch”) and had him walk the same route twice, first with the SMQV to establish a basic range, and then the LT. We were set up in an industrial part of town, warehouses beneath an overpass. This meant a lot of metal in the area, in the support structure for the overpass, and in the numerous cars and trucks parked on the street. I set up on the loading dock of a warehouse, and my assistant first walked straight down the block for line-of-sight, and then again to around the corner to test indirect reception.

Thiiiiiiiis close. 
I got 144 yards line of sight before appreciable dropouts, and around the corner yielded 70 yards (linear, not “as the crow flies”), with essentially equal reception in both receivers. While it’s not exactly scientific, I’m going to go ahead and say that the LR offered identical performance to the 411 in this scenario. The sound quality with all units in Digital Hybrid mode was indistinguishable as well.

Does that make the LR a 411 killer? Nope. It’s a different kind of receiver, one that offers high quality in a smaller form factor, which is not without compromise. Were I setting up a small bag (boom and two wireless), I’d consider the L series. The quality is the same, and the savings is worth having to pop them out of the bag to check the side display screens. But only for a small bag, as yanking out a handful of RXs throughout a shoot day feels impractical.

In some ways, the L series feels like a reaction to the Sennheiser G series, in form factor and intent. The G3s also offer a top function switch and IR syncing between the RX and TX. The Lectros, though, far exceed the Sennheisers in terms of quality and performance. It’s more like Sennheisers are scratch track wireless that can be pressed into service as a lav mic, whereas the L series is a full quality lav mic that is small enough to be used for a scratch track. The Digital Hybrid fidelity is entirely overkill when you’re feeding a DSLR via a minijack.


PROS:
  • Digital Hybrid quality at a lower price.
  • Smaller, lighter RX now practical for mounting on smaller cams.
  • Wide band future proofing and flexibility.


CONS:
  • Side-mounted display limits usefulness of RX in a bag setup.
  • Single channel: if used as a camera hop, two RXs are required for full stereo mix.
  • If sending only a mono scratch track (especially to a lo-fi input like a DSLR), the L series feels like overkill.


Street prices:
LT - $1199
LR - $1189

www.lectrosonics.com

19 May 2014

The New Newspamphletter

Greetings, campers. It’s been a bit since the last Official Syncsound Audio Newspamphletter, so buckle up. (Not because it’s super exciting or anything, just a friendly reminder to always use your seatbelt in a moving vehicle. Safety first!)


Now, on to the newspamphling: alterations and updates have been made to the main mix cart (the missile defense shield is back-ordered). From the ground up: the power supply was recently upgraded from a lead acid to a Powerstar EuroLife Lithium Ferrite system, delivering more power with less weight (less weight = less grumpiness from sound mixer. Everyone wins!). 


Remember, kids: "green" is "power", and "red" is "eject". NEVER PRESS RED WHEN I'M WORKING, NO MATTER HOW FUNNY IT IS.

The EuroLife was intended for another cart design, but with the addition of some strategic stabilizing solutions (read: Velcro), it integrates just fine into the Rastorder Foldup cart.


At the top of the cart, you’ll notice an RF Venue Diversity Fin, a combination dipole/LDPA antenna in addition to a standard sharkfin. This may seem redundant, but is by design. Rather than use the RF Venue as a dual receiver antenna, I am employing the dipole as a transmitting antenna for the Lectro IFB system. I had been using Lectro’s own dipole antenna for the IFB, but this meant mounting three antennas on the cart, which was unwieldy at times. Now, the dipole section transmits, and the LDPA functions as a second sharkfin receiver. Having done numerous walk tests, I can confirm performance is at least as good as having three separate antennas. (RF Venue doesn’t recommend this practice per se, but the tests bear out the concept).


The Ol' Switcheroo

On the picture side, I’ve added a Monoprice A/B SDI switcher. As I only have real estate for a single monitor, I’ve had to make a choice when shooting with two camera coverage. When it’s a tight-and-wide, I monitor the wide, as this is more crucial for keeping the boom out of frame. But when we have cross coverage with two mediums or close ups, it can be limiting. The switcher allows me to check both frames while keeping the cart light and collapsible. Seeing as how my request for a Bugattii Utility Vehicle goes unheeded (thanks for nothing, Wolfgang!), I need to keep the entirety of my kit modular enough to fit into a Subaru Forester.


Tucked under the top shelf, just behind the CL-9 is a Demerbox Active Speaker. A rechargeable lithium battery powers the speaker, which can accept 3.5mm minijack or bluetooth. It's too underpowered for playback use, but has plenty of oomph for a cart speaker. The fact that it's built into a waterproof Pelican case makes it a great choice for the dry, sunny Oregon weather.


In the doodads department, I recently acquired the Mozegear TIG, a svelte timecode reader/generator that offers a very elegant way to stripe timecode as LITC, meaning you can record timecode on cameras that don’t normally accept it (like DSLRs and the Blackmagic cameras). It also has a option to output timecode on one channel of audio and allow a scratch track on the other. Check out my review here.


So, here are both the main and follow cart. The rest of the main mix cart is the same: based on a 788T bag, it comes with a CL-8, a CL-9, IFB and Comtek, and a Lectro Field Venue with VRT receiver modules.


On the follow cart you’ll see my SD 664 bag, for smaller ENG/EFP gigs, which also functions as a mobile/backup setup on bigger film/TV jobs. The lower shelf also holds a case of Comtek receivers. Two are included with the kit; up to (8) more are available a la cart (even more can be sub-rented with advance notice).


Finally, the piece of resistance: the Glacier’s Edge Mark II Collapsible Posterior Support System. Forged of not-aircraft-grade aluminum, the system is enshrouded with ballistic nylon, capable of withstanding a shock load of thousands of grams. The system comes equipped with a horizontal accessory platform (aka “tray”), as well as vulcanized high-friction stabilizing pods. It’s a real beaut, but if you want one, you’d better start saving. They can sell for literally tens of dollars.

And there you have it. Minor tweaks here and there, but the little things do add up, providing a leaner, meaner sound department. Okay, we’re not mean... unless we’re pushed too far:


"HULK SAID HOLD FOR PLANE!"

26 March 2014

The Mozegear TIG


I must admit, the first time I read the name “Mozegear”, my first thought was a line of swag featuring Cousin Mose Schrute:

Come on, who wouldn’t buy that shirt for $49.95?

Upon further reading, it became apparent that instead of a taciturn beet farmer with an odd running form, it was an upstart outfit in Arizona, and they’d made a small, versatile new timecode generator/reader, the TIG.

The TIG can be used just like boxes such as the Ambient Lockit or the Denecke SB-3, jammed once at call and once again at lunch, and it will feed the camera with good TC, regardless of any battery changes on the camera itself. The TCXO is rated at +/-.5 PPM, and while it’s not quite the .1 PPM that you generally see, it’s more than accurate enough to get you through 6 hours before re-jamming. (One issue I ran into while testing the TIG: if you happen to use a lemo-dual XLR cable, you will need to ensure that pins 1 and 3 are tied together in the cable chain. I had to go find an unbalanced FXLR to 1/4" MTRS adapter, rather than the off-the-shelf balanced adapter I had been using with my Denecke slates and SB-Ts.)


In use on the Arri Alexa for 2nd Unit with NBC's "Grimm".


In lieu of a display, Mozegear opted for the LED blink code as a visual jam/rate indicator. They thoughtfully silkscreened the code onto the TIG itself, saving you the hassle of diving into a manual in the field. It supports all the commonly used frame rates, including drop frame, up to 30 FPS. There is a rotary rate selector under the hinged battery door, protecting the switch from being accidentally bumped during use.


The TIG is smaller than either the SB-3 or Lockit, almost by half. It’s light, and runs on (2) AAA batteries. The small form factor and low weight will certainly please ACs building either Steadicam or DSLR rigs, which brings me to its killer features: in addition to the standard BNC, it also offers a LTC output on a 3.5mm minijack. This output will feed TC to one audio track of a camera that lacks a dedicated TC input (DSLRs and the Blackmagic line, for examples).


One of these things is awesome with timecode...


With DSLRs, however, you run into the obstacle of a single audio input. If you feed TC, you lose the camera mic and the option of sending a scratch track as well. Mozegear considered this, and provided an audio input on the TIG, which then allows you to feed scratch track to one channel and TC to another on a single minijack cable. This ensures that post will have a courtesy mix for reference before they sync dailies.

On the post side, the only workflow that I’ve tested directly is using the Blackmagic Cinema camera and the free, cross-platform Davinci Resolve Lite software. Once you import your video files, you set each clip to read its TC from the LTC on its audio track. You can then batch sync picture and sound for the day and export for use in your NLE. Easy peasy.

Ah, the internets. You never fail me.

The only other comparable product I’m aware of is the Zaxcom ERXTCD. It offers both audio and TC output from a single device, with the added benefit of being a receiver itself. With the TIG, you’ll still have to mount an RX (IFB/Comtek or dealer’s choice) and send its output through the TIG to lay down audio with TC in the case of a DSLR. The drawback of the Zaxcom unit is that it only jams from Zaxnet, and cannot be used as a TC reader with gear from any other manufacturer. I’d say that if your rig is already Zaxcom, then the ERX would be the way to go for you.

Small, light, versatile, and affordable ($399 MSRP, lower priced and offering more functionality than the next least expensive option, the SB-3), the TIG is a can’t-lose. If you’re building your kit and it’s time to add TC, you find yourself in need of adding TC to a DSLR situation, or you simply want an affordable backup, the TIG is the way to go.

PROS:
  • small size and weight
  • affordable
  • enables TC post production for non-TC cameras
  • audio pass-through; you still get a scratch track

CONS:
  • no word clock (though that need is specific)
  • one more battery type to add to inventory
  • you’ll have to hold editorial’s hand while you explain the post process to them


MSRP: $399


09 February 2014

Go Boom or GoPro


Often when we’re in the trenches during the heat of battle, we employ any number of  analogies to communicate with production (like, say, stale military metaphors).

“Take 6: NG due to mortar fire.”

It can help you to relay an idea to someone who doesn’t share your tech background. In turn, this can help us to fulfill our responsibilities in capturing usable assets for post.

Modern productions don’t always understand the limitations that they impose upon themselves, so it falls to us to provide insight so that those in charge can make an informed decision. It would be nice if they would simply defer to us, but it’s their show. Not only must we be tactful, but creative; remember, we’re often the only ones who fully understand the technical ramifications of certain choices. We have to be able to ensure that the other person has a firm grasp of the situation without the benefit of years of technical instruction in audio.

One that I’d been mulling recently was an easy way to explain why wireless mics aren’t the magical unicorns that they’re imagined to be. 


“Nope.”

Devendra Cleary, C.A.S., has hit upon a brilliant tactic in the latest C.A.S. Quarterly Journal:

“Wires are the 'GoPros' of sound. First, they are both smaller and of lesser quality than the traditional inventory of equipment we both use. Secondly, they are prepared, attached in their position, and out of our technician’s hands as the shot is being acquired. Due to how a director designs a shot, sometimes a GoPro is the most brilliantly effective way to capture it, and quite possibly the only way to. Wires are the same. Sometimes, due to how a shot is designed, wires are the only way to capture the dialog. This is fine. But no one would ever expect a DP to capture every shot using a GoPro...

Let’s say we just shot a bunch of stunts and car crashes with Go Pros rigged everywhere. The DP and director are happy and it’s time to move on to the close-ups of our actor’s dialog. Imagine if the DP was asked to continue to capture those close-ups with the GoPros instead of their favorite, high-quality 100mm prime lens attached to an Alexa camera. It would be unacceptable. So it is not unreasonable for us to want to capture that same dialog with our high-quality overhead boom mic of choice.”

Nailed it.